So today I learnt you can connect to a coms port using screen!
eg
screen /dev/ttyUSB0 115200 8N1
same screen key bindings work :)
no need for minicom crap now!
Tuesday, 24 April 2012

Tuesday, 10 April 2012
perl modules in ubuntu
Thought I better write this down before I forget it, how to install missing perl modules under ubuntu using apt-get
so say you see this:
Requirements
------------
Net::LDAP
Getopt::Std
Net::Nslookup
Net::Dns
how do you install those?
well simple...
apt-get install libnet-ldap-perl
apt-get install libnet-dns-perl
etc
so say you see this:
Requirements
------------
Net::LDAP
Getopt::Std
Net::Nslookup
Net::Dns
how do you install those?
well simple...
apt-get install libnet-ldap-perl
apt-get install libnet-dns-perl
etc
Saturday, 31 March 2012
Flash Video over other windows even when firefox is minimised
Fecking annoying bug recently, if i opened a flash video in firefox it would mess up other windows by showing through everything, even if i minimised firefox.
The fix was pretty easy
In a terminal, execute
gstreamer-properties
and in the second tab change the Plugin option in the "Default Output" to "X Window System - Without XV".
The fix was pretty easy
In a terminal, execute
gstreamer-properties
and in the second tab change the Plugin option in the "Default Output" to "X Window System - Without XV".
Thursday, 22 March 2012
Removing Ubuntu One (ubuntuone-syncd)
First track down and kill the process of ubuntuone-syncd
ps -ef|grep ubuntu
kill -9 {pid number}
then remove the folders it uses
rm –rf ~/.local/share/ubuntuone
rm –rf ~/.cache/ubuntuone
rm –rf ~/.config/ubuntuone
rm –rf ~/Ubuntu\ One
then remove the packages
sudo apt-get purge ubuntuone-client* python-ubuntuone-storage*
you should be sorted!
ps -ef|grep ubuntu
kill -9 {pid number}
then remove the folders it uses
rm –rf ~/.local/share/ubuntuone
rm –rf ~/.cache/ubuntuone
rm –rf ~/.config/ubuntuone
rm –rf ~/Ubuntu\ One
then remove the packages
sudo apt-get purge ubuntuone-client* python-ubuntuone-storage*
you should be sorted!
Saturday, 17 March 2012
getting yaptest to run under ubuntu
So here are some (hopefully complete) notes I have made over the last few hours trying to get yaptest running
after downloading yaptest from pentestmonkey.net
untar etc
and get that made and installed
next you need to get postgres up and running
so you need to be root
dont forget to start it /etc/init.d/postgres start
You also need a bunch of perl modules
change the pg_hba_conf file too for postgres
change the following lines at the bottom of the file
(/etc/postgresql/9.1/main/pg_hba.conf)
Remember to restart your postgres server ;)
you will need to use this connect to the 127.0.0.1 database, find the yaptest_user under the login roles and give them create db privilages.
you can now run yaptest-wizard.pl to create the database and run yaptest as normal.
ldapsearch is provided by ldap-utils in ubuntu
after downloading yaptest from pentestmonkey.net
untar etc
and get that made and installed
next you need to get postgres up and running
so you need to be root
apt-get install postgresql
dont forget to start it /etc/init.d/postgres start
You also need a bunch of perl modules
apt-get install libdbd-pg-perl

apt-get install libparallel-forkmanager-perl

apt-get install libdigest-md4-perl

apt-get install libxml-simple-perl
change the pg_hba_conf file too for postgres
change the following lines at the bottom of the file
(/etc/postgresql/9.1/main/pg_hba.conf)
# "local" is for Unix domain socket connections only

local   all         all                               trust

# IPv4 local connections:

host    all         all         127.0.0.1/32          trust

# IPv6 local connections:
host all all ::1/128 trust
Remember to restart your postgres server ;)
apt-get install pgadmin3you will need to use this connect to the 127.0.0.1 database, find the yaptest_user under the login roles and give them create db privilages.
you can now run yaptest-wizard.pl to create the database and run yaptest as normal.
ldapsearch is provided by ldap-utils in ubuntu
Sunday, 4 March 2012
Does freezing a laptop battery give it a longer life...(answer no)
So battery on this Dell Mini 9 I got the other day has a terrible battery life, about 2 hours, I decided to do an experiement to see if sticking the battery in the freezer ACTUALLY does something useful
li-ion battery
all testing done with no interaction of the laptop
-- day 1 --
Day one was basically starting from 0% battery to full charge and then letting it run down back to 0% and repeating this several times
Charging from 0% to 100% took 2 hours
Discharging from 100% to 0% was also 2 hours
-- day 2 --
08:30 battery placed in freezer in two bags as per guides on the internet
-- day 3 --
12:00 Battery is removed after 27 hours in the freezer and given two hours to get back to room temperature.
Charging from 0% to 100% takes 2 hours
Discharge from 100% to 0% also takes 2 hours
-- Results --
Freezing the battery has done nothing what so ever to the battery!
-- addendum --
Some people have said that I need to cycle the battery at least 4 times to see an effect, this is currently being done and the results will be posted later on. I dont think it will work...
li-ion battery
all testing done with no interaction of the laptop
-- day 1 --
Day one was basically starting from 0% battery to full charge and then letting it run down back to 0% and repeating this several times
Charging from 0% to 100% took 2 hours
Discharging from 100% to 0% was also 2 hours
-- day 2 --
08:30 battery placed in freezer in two bags as per guides on the internet
-- day 3 --
12:00 Battery is removed after 27 hours in the freezer and given two hours to get back to room temperature.
Charging from 0% to 100% takes 2 hours
Discharge from 100% to 0% also takes 2 hours
-- Results --
Freezing the battery has done nothing what so ever to the battery!
-- addendum --
Some people have said that I need to cycle the battery at least 4 times to see an effect, this is currently being done and the results will be posted later on. I dont think it will work...
Dell Mini 9 Linux wifi broadcom drivers (solved) (updated!)
OK so most of this weekend I have spent fucking about trying to find a lightweight linux OS that worked with the broadcom wifi built in.... here are the results
Crunchbang - doesn't install from USB (using unetbootin)
Ubuntu 12.04 beta - didn't work out the box
Ubuntu 10.04 - worked but way way too heavy
Ubuntu 11.10 - too heavy hate gnome3 and unity
Arch - argghhhh just NO
Xubuntu - lightweight but didn't work out the box
Linux mint debian xfce - didn't work out the box
Linux mint 12 - Live CD worked fine - useable but installed didn't work and needed a wired connection
So what have I gone for? Linux Mint 12, set up with a wired connection to install the bcm-kernal-sources which i am hoping to move over to xfce.
** update **
So i have finally found a perfect solution on getting the dell mini 9 to play nice!
first add this to your software repository (using synaptic for example)
deb http://ftp.us.debian.org/debian testing main contrib non-free
then do the rest in a root termin (sudo -s)
apt-get update
apt-get install module-assistant wireless-tools
m-a a-i broadcom-sta
echo blacklist brcm80211 >> /etc/modprobe.d/broadcom-sta-common.conf
update-initramfs -u -k $(uname -r)
modprobe -r b44 b43 b43legacy ssb brcm80211
modprobe wl
should be done :D
Crunchbang - doesn't install from USB (using unetbootin)
Ubuntu 12.04 beta - didn't work out the box
Ubuntu 10.04 - worked but way way too heavy
Ubuntu 11.10 - too heavy hate gnome3 and unity
Arch - argghhhh just NO
Xubuntu - lightweight but didn't work out the box
Linux mint debian xfce - didn't work out the box
Linux mint 12 - Live CD worked fine - useable but installed didn't work and needed a wired connection
So what have I gone for? Linux Mint 12, set up with a wired connection to install the bcm-kernal-sources which i am hoping to move over to xfce.
** update **
So i have finally found a perfect solution on getting the dell mini 9 to play nice!
first add this to your software repository (using synaptic for example)
deb http://ftp.us.debian.org/debian testing main contrib non-free
then do the rest in a root termin (sudo -s)
apt-get update
apt-get install module-assistant wireless-tools
m-a a-i broadcom-sta
echo blacklist brcm80211 >> /etc/modprobe.d/broadcom-sta-common.conf
update-initramfs -u -k $(uname -r)
modprobe -r b44 b43 b43legacy ssb brcm80211
modprobe wl
should be done :D
Tuesday, 14 February 2012
Network Thumbnails in Ubuntu
Just found this out as a cure for a little annoyance of mine, not seeing thumbnails of images/files over network shares.
goto Nautilus > edit > preferences > preview
and change thumbnails to Always rather than Local Only.
Another small problem in life fixed!
goto Nautilus > edit > preferences > preview
and change thumbnails to Always rather than Local Only.
Another small problem in life fixed!
Friday, 27 January 2012
3d Rep-rap printer build (phase 2)
Thought I would share the current state of the 3d Rep-rap printer I am building... z-motors installed along with Z-guides, the Y axis wood bed (the Z motor wires are sitting on it) is also installed now and everything is now tightened up and secure - the weight has pretty much trebled too!


Saturday, 21 January 2012
ATM card skimmer (real)
Well as I am being all photographic today, I thought I should get some photos up of the ATM I aquired from some friends who found it on an ATM machine in Oxford Street London (they contacted the police but they didnt seem to care - nice!) So after some months I have it and here it is in its full glory.


Now to try to figure out how it works and get into some proper hardware reverse engineering!

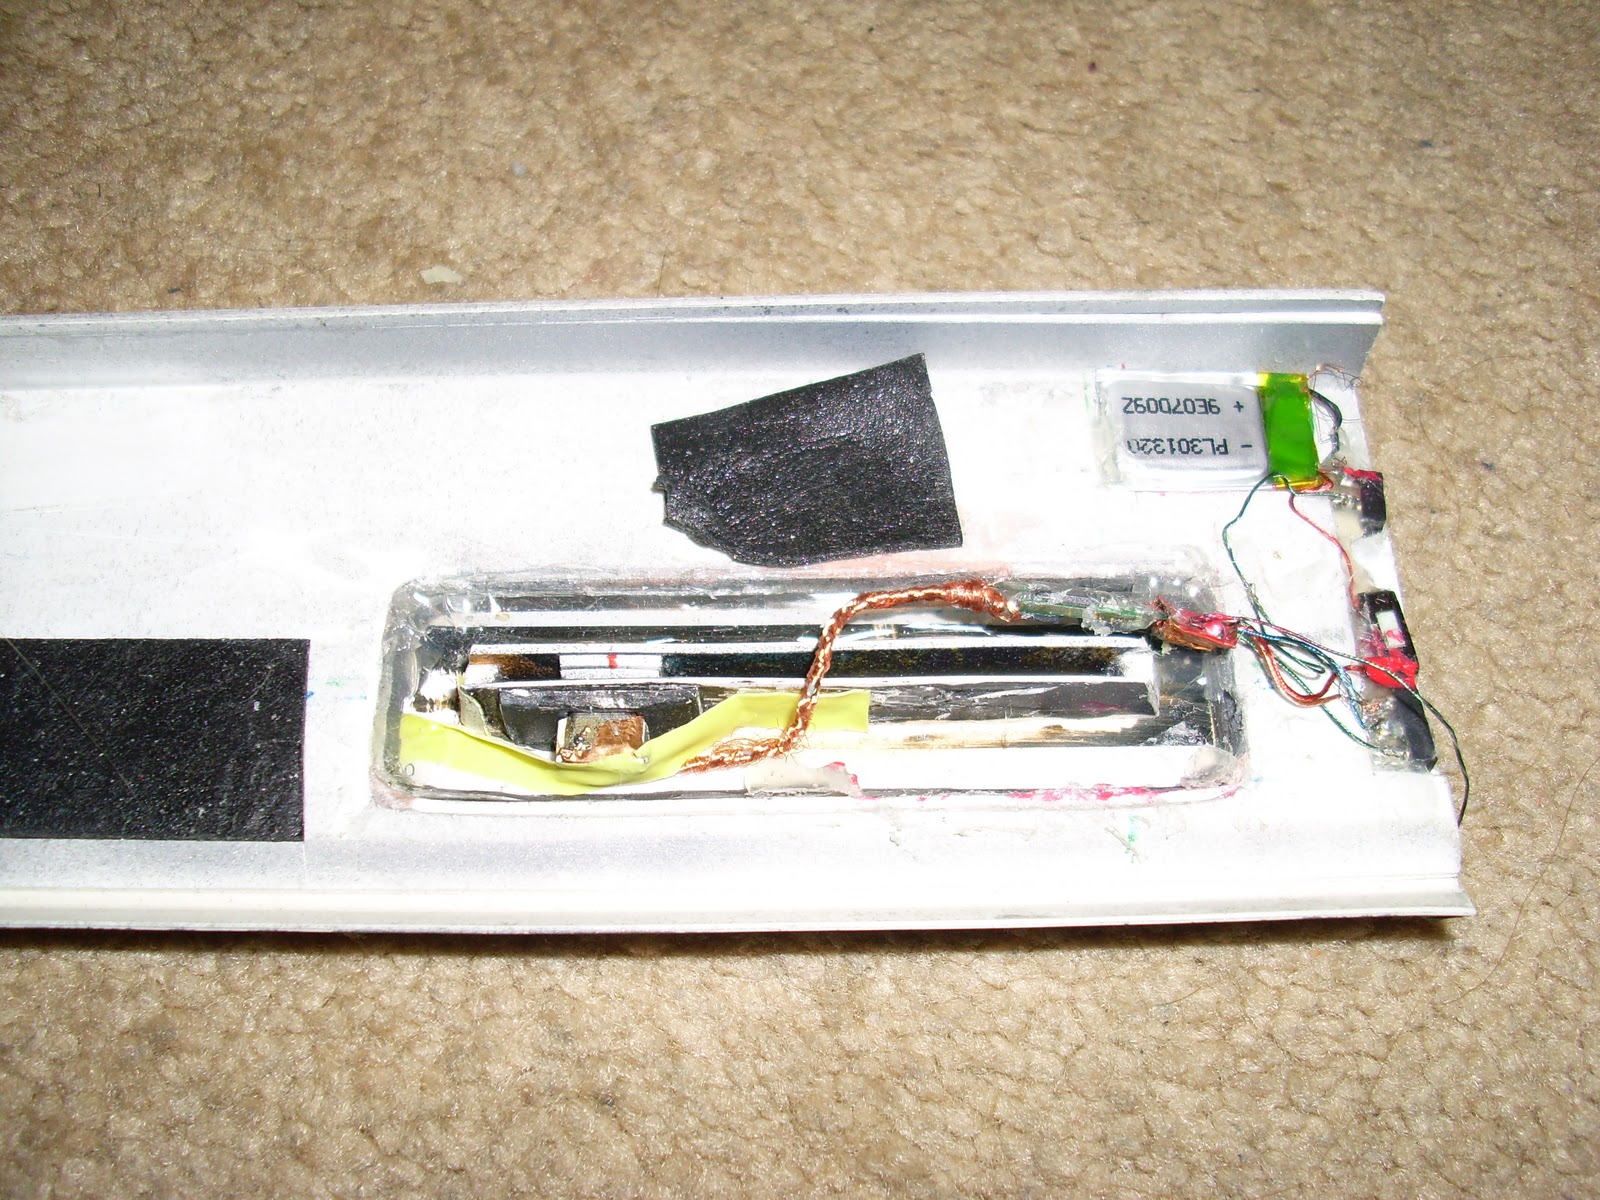


Now to try to figure out how it works and get into some proper hardware reverse engineering!
Shop anti theft tag (non dye version) taken apart.
Did this a while ago and never got round to blogging it.
This is the type im on about. (it was very damaged from removal by monkeys)

Here we see the damaged tag taken apart, you can (hopefully) see the RFID security part in the long area, and the pin (on the right top) and the black part on the left top is the pin retainer.

Here you can see the RFID disassembled on the left, and the pin+ retainer on the right top, using a magnet you pop the pin retainer off and the pin comes free.
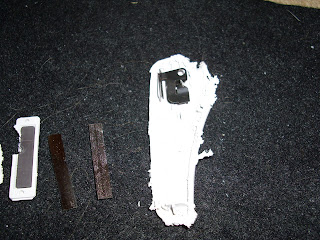 I leave it to the reader as an excersise on where to place a rare-earth magnet to dislocate the pin retainer.
This is the type im on about. (it was very damaged from removal by monkeys)

Here we see the damaged tag taken apart, you can (hopefully) see the RFID security part in the long area, and the pin (on the right top) and the black part on the left top is the pin retainer.

Here you can see the RFID disassembled on the left, and the pin+ retainer on the right top, using a magnet you pop the pin retainer off and the pin comes free.

Sunday, 6 November 2011
Motorola Xoom Android Honeycomb non-mobile web browser setting (fixed)
So since buying a Xoom when it was launched one thing has bugged me from the start, its browser would be detected as a mobile device and websites would redirect me to their mobile version - which sucked specially for sites not offering a way to move back to the full site.
It seems alot of people have had this issue so here is the solution.
open the browser and close all the tabs so the browser shuts off, reopen it and click the url bar and type about:debug now click the icon in the top right and goto settings then debug then UAString and select Desktop.
you can now browse like normal people!
It seems alot of people have had this issue so here is the solution.
open the browser and close all the tabs so the browser shuts off, reopen it and click the url bar and type about:debug now click the icon in the top right and goto settings then debug then UAString and select Desktop.
you can now browse like normal people!
Thursday, 20 October 2011
ubuntu unity launcher hiding behind windows (solved)
OK an annoying but that happened a few times now is the launcher and tab-switcher like to hide behind any other window so i cant see them...this is a bug and not the set up behaviour..
so how to solve this without fucking everything your doing up? easy
open a terminal and write
unity&disown
then hit enter and a few screen flicks later - your back in business with nothing lost - AWESOME!!
so how to solve this without fucking everything your doing up? easy
open a terminal and write
unity&disown
then hit enter and a few screen flicks later - your back in business with nothing lost - AWESOME!!
Saturday, 15 October 2011
ubuntu 11.10 upgrade black screen, cant login, wifi button blinking (all solved!)
So today was full of fail for the new ubuntu 11.10 upgrade....
first snort failed to upgrade and because it was doign an upgrade i had no wifi to send the report which killed the upgrade.....cunts - that was just hte start of problems.
Eventually I got the thing upgraded and was presented with the five dots screen, then a black screen.....nothing...no matter what i did helped.
(solution)
ctrl+alt+1
login
sudo -i
mkdir -p /run /run/lock
rm -rf /var/run /var/lock
ln -s /run /var
ln -s /run/lock /var
reboot
so that fixed the black screen error.....but now i couldnt log in under gui except as guest which to be honest fucking sucked donkey cock!
(solution)
ctrl+alt+1
login
sudo rm ~/.Xauthority
go back to your gui (ctrl+alt+7) and login
so now ive fixed that....next problem!!
I have a HP elitebook 8440p which has an intel wifi, it has a nice touch button/indicator above the keyboard to turn the wifi on and off and also as an indicator (orange off/blue on) but since the upgrade it now blinks when wifi data is sent (all the time...and so its fucking annoying) so how to fix this new feature?
(solution)
echo 'options iwlagn led_mode=1' >> /etc/modprobe.d/wlan.conf
modprobe -r iwlagn && modprobe iwlagn
now im all sorted :)
first snort failed to upgrade and because it was doign an upgrade i had no wifi to send the report which killed the upgrade.....cunts - that was just hte start of problems.
Eventually I got the thing upgraded and was presented with the five dots screen, then a black screen.....nothing...no matter what i did helped.
(solution)
ctrl+alt+1
login
sudo -i
mkdir -p /run /run/lock
rm -rf /var/run /var/lock
ln -s /run /var
ln -s /run/lock /var
reboot
so that fixed the black screen error.....but now i couldnt log in under gui except as guest which to be honest fucking sucked donkey cock!
(solution)
ctrl+alt+1
login
sudo rm ~/.Xauthority
go back to your gui (ctrl+alt+7) and login
so now ive fixed that....next problem!!
I have a HP elitebook 8440p which has an intel wifi, it has a nice touch button/indicator above the keyboard to turn the wifi on and off and also as an indicator (orange off/blue on) but since the upgrade it now blinks when wifi data is sent (all the time...and so its fucking annoying) so how to fix this new feature?
(solution)
echo 'options iwlagn led_mode=1' >> /etc/modprobe.d/wlan.conf
modprobe -r iwlagn && modprobe iwlagn
now im all sorted :)
Friday, 14 October 2011
Installing and getting CUDA to work under ubuntu 11.04 x64 bit
So I want to play with CUDA in the coming months, getting it to work under ubuntu 11.04 was a challenge in itself specially running x64bit!
so here is how I got it working..
sudo add-apt-repository ppa:aaron-haviland/cuda-4.0
sudo apt-get update
sudo apt-get upgrade
64-bit :
sudo apt-get install nvidia-cuda-gdb nvidia-cuda-toolkit nvidia-compute-profiler libnpp4 nvidia-cuda-doc libcudart4 libcublas4 libcufft4 libcusparse4 libcurand4 nvidia-current nvidia-opencl-dev nvidia-current-dev nvidia-cuda-dev opencl-headers
32-bit :
sudo apt-get install nvidia-cuda-gdb nvidia-cuda-toolkit nvidia-compute-profiler lib32npp4 nvidia-cuda-doc lib32cudart4 lib32cublas4 lib32cufft4 lib32cusparse4 lib32curand4 nvidia-current nvidia-opencl-dev nvidia-current-dev nvidia-cuda-dev opencl-headers
this is really important, if you didnt have nvida drivers already installed, you have to run this
sudo nvidia-xconfig
the next thing to do even if you skipped the last line is to REBOOT - you MUST do this!!
CUDA should now be working :)
-- to get compiling working is another ball ache!
in somewhere like your home folder do the following
mkdir gcc44
cd gcc4
ln -s /usr/bin/cpp-4.4 cpp
ln -s /usr/bin/gcc-4.4 gcc
ln -s /usr/bin/g++-4.4 g++
edit /etc/nvcc.profile to look in the gcc44 directory (give it the full path)
compiler-bindir =/home/xxx/gcc44
now your ready to compile stuff - here is an example
nvcc -c yourprog.cu
that should give you a .o file then run the next
g++-4.4 -lcudart yourprog.o
that should give you a a.out file - just run it as ./a.out
so here is how I got it working..
sudo add-apt-repository ppa:aaron-haviland/cuda-4.0
sudo apt-get update
sudo apt-get upgrade
64-bit :
sudo apt-get install nvidia-cuda-gdb nvidia-cuda-toolkit nvidia-compute-profiler libnpp4 nvidia-cuda-doc libcudart4 libcublas4 libcufft4 libcusparse4 libcurand4 nvidia-current nvidia-opencl-dev nvidia-current-dev nvidia-cuda-dev opencl-headers
32-bit :
sudo apt-get install nvidia-cuda-gdb nvidia-cuda-toolkit nvidia-compute-profiler lib32npp4 nvidia-cuda-doc lib32cudart4 lib32cublas4 lib32cufft4 lib32cusparse4 lib32curand4 nvidia-current nvidia-opencl-dev nvidia-current-dev nvidia-cuda-dev opencl-headers
this is really important, if you didnt have nvida drivers already installed, you have to run this
sudo nvidia-xconfig
the next thing to do even if you skipped the last line is to REBOOT - you MUST do this!!
CUDA should now be working :)
-- to get compiling working is another ball ache!
in somewhere like your home folder do the following
mkdir gcc44
cd gcc4
ln -s /usr/bin/cpp-4.4 cpp
ln -s /usr/bin/gcc-4.4 gcc
ln -s /usr/bin/g++-4.4 g++
edit /etc/nvcc.profile to look in the gcc44 directory (give it the full path)
compiler-bindir =/home/xxx/gcc44
now your ready to compile stuff - here is an example
nvcc -c yourprog.cu
that should give you a .o file then run the next
g++-4.4 -lcudart yourprog.o
that should give you a a.out file - just run it as ./a.out
Subscribe to:
Posts (Atom)

